Showing posts sorted by relevance for query process art. Sort by date Show all posts

Fun and Creative Kids Activity: Stamping Bunches of Grapes Process Art

 Looking for a fun and creative kids activity that is both educational and festive? Look no further than stamping bunches of grapes with pencil erasers and wine corks! This activity is perfect for kids of all ages, and it can be enjoyed indoors or outdoors.


We love to paint with all kinds of things! From wine corks, to dried flower heads, and everything in between. This easy painting project is perfect for kids of all ages. Little ones will love working on a few bunches or grapes, while tweens and teens can create more elaborate works of art.

What is Process Art for Kids

Process art for kids is a type of art where the focus is on the process of creating the art, rather than the finished product. This type of art is often open-ended and allows kids to be creative and expressive. There are many different types of process art that kids can do, such as:

  • Painting
  • Drawing
  • Collage
  • Sculpture
  • Performance art
  • Installation art

Process art is a great way for kids to explore their creativity and to learn about different art materials and techniques. It can also help them to develop their fine motor skills and their problem-solving skills.

Here are some tips for doing process art with kids:

  • Provide a variety of art materials and let kids explore them.
  • Don't be afraid to get messy!
  • Encourage kids to be creative and expressive.
  • Don't judge their art.
  • Celebrate their creativity.

Process art can be a lot of fun for kids. It's a great way for them to express themselves and to learn about art. So get creative and let your kids explore the world of process art!


Supplies:

  • Purple Paint
  • Green Paint
  • A paper plate
  • A pencil eraser
  • A wine cork
  • White paper


Begin by stamping one purple dot, then on the next row, stamp two. Repeat thru 4 to 5 rows of grapes.


Repeat until your paper has plenty of purple bunches of grapes. 


Now grab your wine cork and dip into the green paint.


Fill the blank space in between grapes with green dots for leaves. When you are finished your paper should look like this.


So pretty! Let this dry and display it somewhere in the house. You could stick it on the fridge, but this turns out so cute you might want to frame it.


This is a perfect spring or summer craft for kids of all ages. It is easy, and needs no special supplies. I know you will have fun with this process art project.


Find more fun kids craft ideas here:

Pineapple process art

Cork and Button Apple Trees


Here are some process art for kids ideas:

  • Painting with natural materials: Gather some natural materials, such as leaves, flowers, twigs, and grass. Dip the materials in paint and then stamp them onto paper.
  • Collage: Collect a variety of materials, such as magazines, newspapers, fabric, and yarn. Cut out shapes from the materials and then glue them onto paper to create a collage.
  • Sculpting with playdough: Playdough is a great material for sculpting. Kids can use their imaginations to create anything they want, such as animals, people, or objects.
  • Performance art: Performance art is a type of art that is performed in front of an audience. Kids can create their own performance art pieces, such as dances, songs, or plays.
  • Installation art: Installation art is a type of art that is installed in a specific space. Kids can create their own installation art pieces, such as sculptures, paintings, or photographs.

These are just a few ideas for process art for kids. There are many other possibilities, so get creative and let your kids explore their imaginations!

Pineapple Process Art

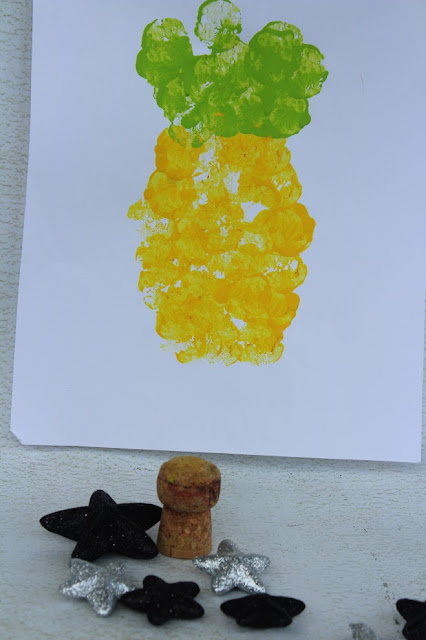
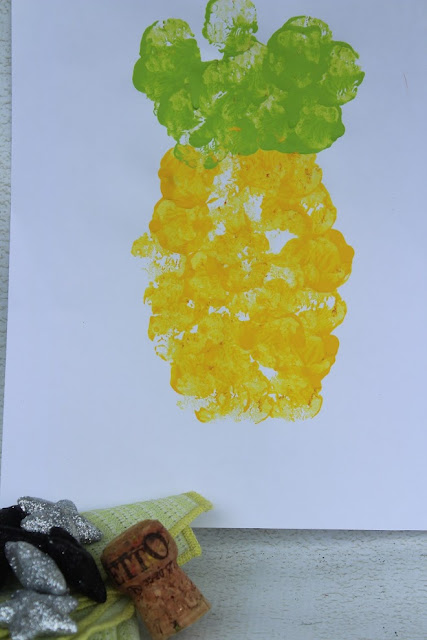
 This pineapple painting project is perfect for little ones. It takes only a moment of set up and it creates such a cute art project! Kids are going to be so proud of their efforts and want to display this project on the fridge door gallery!


Harper and I love to get creative together. We are always crafting, painting or baking something. 
You might remember we made this adorable apple process art with a cork.  Well, we ran across the cork again and decided that it was so fun to paint with it, that we would give it another go. We came up with this cute pineapple art. We love it because it can work for a summer day project, or pull this out around the new year to bring good luck to your space.


Supplies:

Paper Plate

Yellow and Green Paint

A Cork

Copy Paper


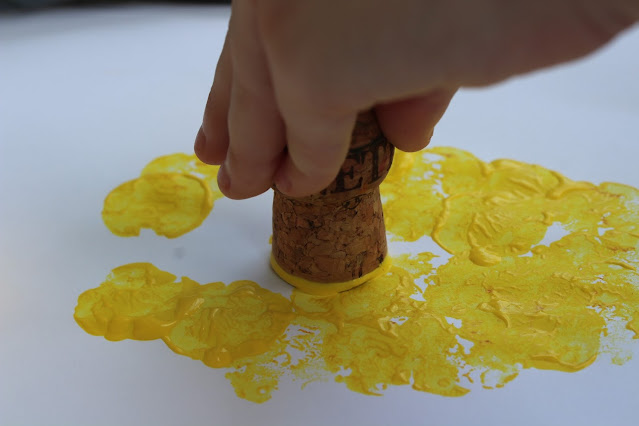
Pour a quarter size drop of several shades of yellow and a shade of green onto a paper plate.


Offer your child the cork and encourage the child to stamp a pineapple shape with the yellow paints.


When the pineapple is shaped encourage the child to form the stem of the pineapple with green paint.


                                                             Allow the art to dry then display.


This is a fun project for summertime, but I also love to make these with the kids in anticipation of new year since the pineapple symbolizes a warm welcome, celebration and hospitality.


You can find more process art ideas here

Basket of fruit process art

Cork and button tree art

If you want to learn more about why process art is important for kids this is a great resource from Messy Little Monster

Basket of Fruit Process Art

Lemon and Limes find a second life after their prime with this easy and fun process art activity! It incorporates an introduction to weaving for small hands with a lot of painting fun. This activity is great for kids of all ages from Toddlers and Preschoolers, to older kids, like Rolf who is 11 now and still had fun with this!


Ok, first, let that sink in. Rolf is 11 now. When I started this blog, he was a baby. Literally, just a baby. And here we are 10 years later. Still sharing, growing and creating. Let's have a big group hug!

Next, isn't this such a cute process art project for kids? I love that the touchy, smelly parts make it super engaging for little hands. If you have been reading for a while now, you know how I feel about sensory play and  projects! (I love them!) Well, I also love to paint with Harper too!  We had a few lemons and limes in the fruit basket that were a little shriveled up and unappetizing so instead of tossing them out, we put them to work in an art project.


 Supplies: 
A lemon and a lime, sliced in half
A paper plate
Glue
Scissors
A brown bag of construction paper
Yellow and green paint

Directions:
Cut the brown paper into thin strips.
Offer your child one strip and encourage the child to glue it to the paper.


As you can see we used 3 vertical strips, then began the under/over process of weaving the horizontal strips.

Keep the weaving simple, you only need 3 vertical and 3 horizontal strips of paper. If your older child is creating this, feel free to encourage a more complicated weave!


Now comes the fun!
Pour a little paint (about a quarter size drop of each color) on a paper plate.


Offer the citrus fruit to the child, allow them to squeeze the juice out and pick at the seeds if they want to. They will want to because it is fun and it smells good! Just have a towel nearby to wipe their hands! When all of the seed picking and fruit squeezing is finished, encourage your child to press the fruit into the paint, and begin filling the woven basket with fruit!


Remind your artist to use all of the fruit and colors!


Allow to dry and display.


This is fun to make in the summer, when we are making loads of lemonade, so maybe save a few lemons after squeezing for an art project? Or pull this out in the winter, when the kids need a break. It is such a sunny little process art project that they are bound to love it!

Cork and Button Apple Tree Process Art

This cork and button apple tree process art is perfect for preschoolers or kindergartners this fall. It is an easy activity that requires very little prep. 


We love process art, and we love all things fall around here! Harper and I have been hoarding fall decor since we saw the first adorable decorative pumpkin in stores back in July. Rolf is not so quick to jump seasons, but on the first of September, he said "Finally! It is September. Now we can buy all the pumpkins we want without comment." HA! 


Harper and I felt like painting and wanted to start on some fridge decorations for the season. We came up with these adorable cork and button apple trees. They are so worthy of displaying! Plus, they are easy to make!
 

Supplies Needed: 
Paint in Brown and Green
A Wine Cork
A Paper Plate
White Paper
Buttons
Glue


Directions:
Pour a quarter sized drop of both the brown and the green paint onto a paper plate.
Offer your child the cork.
Encourage your child to first stamp the trunk of the tree with the cork.
Then ask your child to give the tree leaves with the green paint.
Allow to dry for about an hour in a warm, sunny place.


When the paint has dried, offer your child the glue and some buttons. We used yellow for this project to make the kind of apples we like. Feel free to use red, green or even a mix if you like. As you can see below we also made one with red buttons, just because we had so much fun the first time.


Encourage your child to spread out the buttons, pressing them onto dots of glue.


Allow the glue time to dry. Then display! This is perfect for refrigerator art!


Are you looking for more awesome apple art projects for kids? 
Here are some favorites:


Christmas Tree Process Art

 This is such a fun way for kids to paint, without using any brushes! It creates a lovely work of art that adds just the right touch of kid made cheer to your space!


My youngest and I love to paint together. We are always thinking of things to paint, without turning to a paint brush. We came up with this adorable process art using only a cork, a pencil eraser, and some paint. This is the perfect seasonal art project for kids.


Supplies:
Paint in green, red, yellow and brown
A pencil with an eraser
A paper plate
A cork
Paper


Directions:
Pour a little squirt of each color of paint on a paper plate.
Offer your child a pencil with an eraser and a cork.
Encourage your child to form the tree shape by stamping in the green paint, then adding one stamp to the paper.
On the next line, make two stamps.
On the third line, stamp 3 times. You get the idea.
After the tree is formed, using the eraser, dip into the other colors of paint, and start decorating the tree.


                     Use whatever colors you like for the ornaments. We used red, blue and yellow.


                                          Next form the tree trunk with brown paint.

                                         Allow to dry and display.

Isn't this such a cute holiday process art idea? Preschoolers and toddlers might enjoy this too!


You can find all of our Christmas crafts here.

Reader favorites include:

Gnome ornaments

Crafts and Snacks Inspired by Eric Carle

 Calling all crafty critters and curious caterpillars! Are you looking for a fun way to spark creativity and ignite a love for art in your little ones? Then dive into the wonderful world of Eric Carle!

Eric Carle, the beloved author and illustrator behind classics like "The Very Hungry Caterpillar" and "Brown Bear, Brown Bear, What Do You See?", is known for his vibrant collages and whimsical characters. His art style is not only visually captivating but also surprisingly easy to recreate, making him the perfect inspiration for engaging and educational crafts for children of all ages.


A World of Colourful Creations:

This blog post is your one-stop shop for exploring Eric Carle-inspired crafts! We'll be featuring a variety of tutorials designed to bring your favorite Carle characters to life. Get ready to:

  • Chomp Your Way Through a Colorful Caterpillar: We'll show you how to create a delightful "Very Hungry Caterpillar" using construction paper, paint, and some wiggle eyes.
  • See What the Brown Bear Sees: Craft a vibrant menagerie of animals inspired by "Brown Bear, Brown Bear, What Do You See?" using tissue paper and cardstock.
  • Let Your Creativity Bloom: Unleash your inner artist with a Carle-inspired collage project. We'll guide you through creating beautiful textured paper using paints and household objects, perfect for crafting anything your imagination desires!

Be sure to click through the links below to view the full tutorials.

Cotton Ball Polar Bears by Simply Full of Delight


Apple Printed Caterpillars by Sweet Silly Sara

Eric Carle Style Easter Eggs by Red Ted Art

Egg Carton Caterpillar by Crafty Art Ideas

Hungry Caterpillar Fruit Pizzas by A Little Pinch of Perfect


Mixed Media Hungry Caterpillar Art  by Kids Activities Blog

Thumbprint Caterpillars by Simply Full of Delight

Easy Egg Carton and Pipe Cleaner Caterpillars by Simply Full of Delight

Very Busy Spider Snack by The Healthy Family Project

Hungry Caterpillar Sensory Snack by A Little Pinch of Perfect


Hungry Caterpillar Puppets by Messy Little Monster

Hungry Caterpillar Cupcakes by Imaginative Homeschool

Two Headed Paper Plate Snakes by In the Playroom

Hungry Caterpillar Sensory Bin by Mama of Mini’s

Hungry Caterpillar Cookies by Buttercream Parties


Eric Carle Apple Cookies by The Monday Box

Hermit Crab Craft by Little Ladoo

Brown Bear Bento Box by Healthy Family Project


Beyond the Craft Table:

The beauty of Eric Carle crafts is that they're more than just fun activities. They can be a springboard for learning and exploration. Here are some ways to extend the experience:

  • Story Time Fun: After crafting your favorite Carle characters, revisit the original books and act out the stories together.
  • Explore Colors: Use your Carle creations as a jumping-off point to discuss different colors, shapes, and textures.
  • Animal Adventures: Learn about the different animals featured in Carle's books and their habitats.

So grab your scissors, glue, and a sprinkle of creativity – it's time to embark on an artistic adventure inspired by the world of Eric Carle! Stay tuned for our upcoming craft tutorials, where we'll show you step-by-step how to create these delightful projects and bring the magic of Carle's art to life!


Find more awesome crafts for kids:

Easy Ipad stands

Lego Stamped Pumpkins

Apple Process Art

Hungry Caterpillar Process Art

This easy Hungry Caterpillar Process art project is perfect for preschoolers and elementary aged kids. It gives them a chance to create an adorable picture to go along with story time. I don't know about you, but I love storybook crafts for kids!


This project is perfect for fall. We used fresh apples that were too bruised to eat, and painted these cuties with them. If you have an abundance of apples. maybe you will want to put one to work for this art project.


We have lots of apple crafts on site! 
These cork and button apple trees are a favorite fall craft for kids of all ages.
Corked Stamped Apples are an adorable craft for kids.
Apple Tree Window Clings are a fun budget friendly project.
3D Paper Apples are a good project for using up scrap paper.
Apple Tree Addition makes for a fun way to learn math.


Supplies:
An apple 
Green, red , yellow, black paint.
Paper Plate
A pencil
A knife
Paper


Slice an apple in half
Pour a large dallop of red, green and yellow paint onto a paper plate.
We kind of mixed a little green and yellow together to create a cool effect.
Offer a small drop of black paint.


Offer the child an apple and encourage the child to dip the apple into the paint, and stamp the apple, so that the circles touch one another, going across the page.


Have your child give the caterpillar 4 or 5 segments.
Then encourage the child to dip the other apple half into the red paint and stamp the apple to form the head.


Next, dip the pencil into the black paint and create the eyes and mouth of the caterpillar.
Next, dip the pencil into the yellow paint and finish the eyes.
Now, I know what you are thinking.
Why not use a paintbrush?
Well, we did try that, but it smeared the yellow and black together. We found that the pencil was much easier to work with; and it gave Harper the chance to paint with a non traditional object. We both enjoyed that! You can kind of see in the mouth of the caterpillar that it is a little messy; that was the paint brush. 


Next, grab the stem from the apple and dip it into the green paint.
Give the caterpillar some antennae.
 

 Allow to dry completely. 

Display and enjoy this cute Hungry Caterpillar craft!