Showing posts with label art projects. Show all posts

Sunflower Stamped Apples

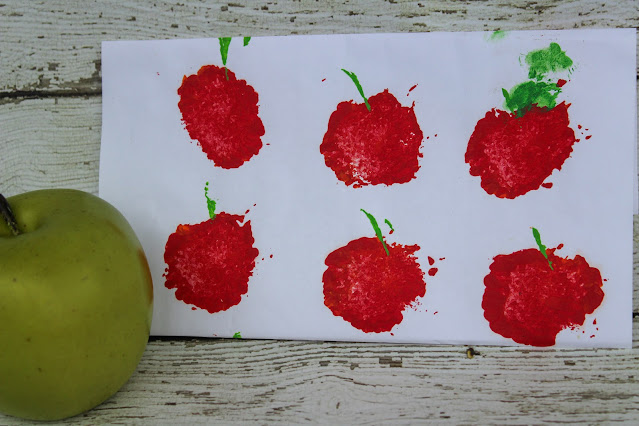
 Kids are going to love this hands on art project that incorporates nature to make a fun print that looks great when displayed! It is easy, needs the most basic supplies and turns out to be so cute!  Make this apple stamping art project after a visit to the orchard, or just as a fun craft to do together.


Photo Credit: Sara Lehman.


Aren't these apples the cutest thing for little hands? All you need is a few colors of paint, a sheet of paper and a dried up sunflower head to make these with your kids. This is great for younger kids.


We visited the farmers market and purchased some sunflowers a few weeks earlier. After they had started to dry out, we plucked the petals off and were left with the heads.

Harp and I thought it would be fun to paint with them, so I grabbed a few bottles of cheap paint and some paper. This is what we came up with.

Supplies:
Paint in red, green and yellow
Paper Plate
Sunflower

Photo Credit: Sara Lehman.

Pour  paint onto a paper plate. You need about a quarter sized drop.

Press your sunflower head into the paint and press it onto the paper.

Repeat as desired.

Photo Credit: Sara Lehman.


Find more fun kids art projects here:
Pineapple Process Art
Christmas Tree Art
Cork and Button Apple Tree Art


Basket of Fruit Process Art

Lemon and Limes find a second life after their prime with this easy and fun process art activity! It incorporates an introduction to weaving for small hands with a lot of painting fun. This activity is great for kids of all ages from Toddlers and Preschoolers, to older kids, like Rolf who is 11 now and still had fun with this!


Ok, first, let that sink in. Rolf is 11 now. When I started this blog, he was a baby. Literally, just a baby. And here we are 10 years later. Still sharing, growing and creating. Let's have a big group hug!

Next, isn't this such a cute process art project for kids? I love that the touchy, smelly parts make it super engaging for little hands. If you have been reading for a while now, you know how I feel about sensory play and  projects! (I love them!) Well, I also love to paint with Harper too!  We had a few lemons and limes in the fruit basket that were a little shriveled up and unappetizing so instead of tossing them out, we put them to work in an art project.


 Supplies: 
A lemon and a lime, sliced in half
A paper plate
Glue
Scissors
A brown bag of construction paper
Yellow and green paint

Directions:
Cut the brown paper into thin strips.
Offer your child one strip and encourage the child to glue it to the paper.


As you can see we used 3 vertical strips, then began the under/over process of weaving the horizontal strips.

Keep the weaving simple, you only need 3 vertical and 3 horizontal strips of paper. If your older child is creating this, feel free to encourage a more complicated weave!


Now comes the fun!
Pour a little paint (about a quarter size drop of each color) on a paper plate.


Offer the citrus fruit to the child, allow them to squeeze the juice out and pick at the seeds if they want to. They will want to because it is fun and it smells good! Just have a towel nearby to wipe their hands! When all of the seed picking and fruit squeezing is finished, encourage your child to press the fruit into the paint, and begin filling the woven basket with fruit!


Remind your artist to use all of the fruit and colors!


Allow to dry and display.


This is fun to make in the summer, when we are making loads of lemonade, so maybe save a few lemons after squeezing for an art project? Or pull this out in the winter, when the kids need a break. It is such a sunny little process art project that they are bound to love it!

Play Doh Snakes

Looking for a simple way to engage the kids with supplies you probably already have on hand? This easy play doh snakes idea is the way to go. Kids of all ages will love this sensory play idea that combines fine motor work and creativity for an all around fun time!


Now that my kids are enrolled in virtual school for the semester, I have been finding ways to keep them engaged. They finish their work early in the day and have a few hours to fill in the afternoon. I bought a bunch of blank books, small canvases, coloring books, wooden plaques and so onto keep them creating. But, to keep things entertaining, I give them a daily challenge.

Some days, I challenge them to build something specific with legos. another day, I might challenge them to find pine cones, leaves, or sticks of a certain size. My favorite challenges involve play doh. On this particular day I gave them a pile of buttons and a can of play doh and asked them to make an animal. They put their heads together asked for a touch of red doh and 2 little eyes. This is what they came up with. It is so cute, I knew I wanted to share this idea with you.

This post contains affiliate links.


Supplies:
Play Doh, offer 2 colors
Buttons
Googly Eyes

Directions:
Encourage your child to roll a play doh snake and  decorate it with buttons.
Give the snake eyes and carefully give him a tongue.

If you liked this easy play doh idea check out these reader favorites.

Mini Mickey Mouse Jingle Bell Ornaments


As soon as a hint of winter is in the air the kids and I start to clamor for Christmas. We want to decorate, bake and shop! And we want to do it now! This year we started asking Adam about getting our tree ready in October. He knows us too well and he reminded me that we did this with Halloween and by the time it rolled around we were so over that holiday already.


This year we got our early Christmas fix by making a lot of fun ornaments! There is nothing like giving or receiving a kid made ornament, and these are especially fantastic because they are Mickey Mouse themed!

This post contains affiliate links or sponsored content.

 These are so easy and economical that you can make a dozen of these for $3. To make mini Mickey Mouse Jingle Bell Ornaments you will need:

2 sizes of jingle bells; You will need 2 smaller and one larger bell per ornament
Super Glue
Thin ribbon


Instructions:
Begin by threading a 6" section of thin ribbon thru the loop on the larger of your bells.
Tie a double knot in the end to keep it secure.
Next, glue one of the smaller jingle bells onto the side of the larger bell.


 Now glue the other bell onto the other side.
Allow to dry.


I loved these mini sized Mickey Mouse Jingle Bell Ornaments! They were really fun to make and display and we will absolutely be sharing these with friends this Christmas!

We used hot glue to begin this project because the kids can handle the glue gun, I added a bead of superglue to hold these securely. You can use school glue or hot glue, but I recommend the drop of superglue as a precaution. These are so cute that little hands are going to want to grab and shake them!


Tree Silhouette Place-Mat Craft

Once school starts, I am ready for fall. Bring on the warm days and cool nights, the changing of leaves and all things pumpkin!  If my family isn't home together enjoying summer break, let's move on to the next best thing- FALL!

Mr. Sweet Silly Sara had to return to work to get the school library set up and ready for the students on Monday. Rolf has another week before he is officially in school. We are trying to make the most of these lazy end of summer days together.

Yesterday morning, the kids and I were restless. It was cool outside and the grass was very wet with dew, so we decided to savor the time and let the sunshine do its thing to warm the day up and dry the grass before we headed out to play.

To make the waiting more enjoyable we decided to get crafty and make this great tree silhouette placemat. This was so easy to make and my son did a great job on his! I knew I had to share this with you guys!


To make a placemat with your kids, you will need to gather a few basic supplies and then let your creativity flow.


Supplies needed:

2 pieces of transparent contact paper, cut to 5" wide and 8" long sections.
Assorted construction paper in the colors of your choice. We used black, pink, purple and blue.

Instructions:
Begin by having the kids tear up the construction paper into small squares and strips.


Keep the colors separated for easy application of colors.
Next, you will want to carefully peel the back off of one section of contact paper.
Lay it sticky side up.
With a few strips of black paper, make the outline of the tree.


Next, begin applying more strips of paper around the tree. We made our tree placemat to look like the sun was setting, with the colors we often see in the evening sky.


Continue to stick your strips of construction paper to the sticky side of the contact paper.


After you have filled in all of the blank space on the contact paper, peel the backing off of the other section of contact paper. Only expose a small strip! This will make it so much easier to line up.


After you have lined up the beginning of contact paper section #2 to the first section, begin peeling the backing away while smoothing the first second section onto the first. {Does that make sense?!}

Then you have an easy to wipe off and very handy placemat for your little ones!


My son loved that he MADE this place mat. It was so much more important to him than the ones we have that came from a store! I loved how it turned out! It is such a lovely work of art!

This project is great because it is affordable to make. You could make 6 or 7 of these at least for a mere $2 if you buy your supplies at Dollar Tree.

It is also a great way to get your kids using fine motor skills. They will develop the small muscles of the hand with the action of tearing paper. This later plays into handwriting skills among other things.

Asides from that huge benefit, making place mats with your kids offers them the chance to express their creativity and make something they can use and admire and feel proud of!

You might also enjoy this Lemonade Craft idea!